Frequently Asked Questions
A list of Questions frequently asked and the Answers
- Can I see inkjet or laser printing on clear labels on dark bottles (e.g. Wine Bottles)?
- Can clear laser labels be printed with an inkjet printer?
- Can I print a few labels and save the label sheet for future printing?
- Can I print a laser printer product with an inkjet printer?
- Can I use my ALPS printer with Rippedsheets.com label material?
- Can I use Rippedsheets.com label material with my Epson die sub inks?
- Clear Labels on Dark Surfaces?
- Do you have any tips for printing Rippedsheets.com laser products?
- Do you make laser labels with removable adhesive?
- How can I keep the toner from scratching off on my polyester and glossy label sheets?
- How do I make waterproof labels?
- How do I make my image fit onto diecuts on Rippedsheets.com label material?
- How do you price Rippedsheets.com label material?
- If I own a print website will you print for me? As little as one sheet per order?
- MS Word, Making Templates and Labels
- How should I store Rippedsheets.com laser and inkjet supplies?
- How to make domes on your printed labels?
- Inkjet Printing Tips
- Laser Printing Tips
- What are the differences between copier, inkjet and laser printer products?
- What is Rippedsheets.com and ″Where in the world is Rippedsheets.com™″?
- What size should my labels be?
- What type of label adhesive is used?
- Where can I purchase Rippedsheets.com products?
- Which laser printers will not print Rippedsheets.com glossy white laser label materials?
- Will my artwork print on my digital printer with Rippedsheets.com label material?
- Will Rippedsheets.com label material work on all inkjets?
- How do I load blank labels into my printer tray?
- Click here to go to the SunSafe™ Inkjet Inks FAQ.
Q: Can I see inkjet or laser printing on a clear labels on a dark bottles (Wine Bottle)
A: How Dark? Inkjet or laser printing won't show up on most colored bottles or containers when they are printed on clear labels through inkjet or laser printers. You will have the same problem with professionally printed labels. So testing is necessary!
Q: Can clear laser labels be printed with an inkjet printer?
A: Clear laser labels meet all of the requirements to run on standard desktop laser printers. They cannot be printed with an inkjet printer. Rippedsheets.com has developed a full line of inkjet supplies to meet the special demands of inkjet printers.
Q: Can I print a few labels and save the label sheet for future printing?
A: Rippedsheets.com recommends that a sheet of labels be fed only once through a laser or inkjet printer. Our guarantee of jam-free performance extends only to a sheet of labels that has been though a laser printer a single time. The heat and tight paper path of a laser printer can cause the label to curl after multiple passes through the printer. This could cause the label to jam or peel off inside the printer and result in an expensive repair bill.
Q: Can I print a laser printer product with an inkjet printer?
A: No. Each label product is specifically designed for either laser or inkjets.
Q: Can I use my ALPS printer with Rippedsheets.com label material?
A: Yes and No. You may use the laser labels for your ALPS printer but at your own risk. Rippedsheets.com will not guarantee our material and you have no recourse with Rippedsheets.com if the material fails for ANY OR ALL REASONS.
You must use only smooth or glossy laser Rippedsheets.com label material (High gloss paper/perm or ultra-removable & optically clear poly perm for laser--also matte white poly lasers and vinyl's for laser) with the ALPS thermal transfer ribbons, which are available from your ALPS dealer. If you try to print Rippedsheets.com label material with the photo gloss ribbons, they will break.
ALPs users have had spotty luck using laser label and tag materials. Rippedsheets.com is happy to provide our service, but with no warranty, guarantees--on As iS.
Q: Can I use Rippedsheets.com label material with my Epson die sub inks?
A: Rippedsheets.com white laser poly and clear laser poly seem to work okay. You still would print on the transfer paper that works best for you and then heat transfer to Rippedsheets.com label material in the heat press. Do not print the Epson die sub inks onto Rippedsheets.com label material.
Q: Clear Labels on Dark Surfaces?
A: Inkjet and Laser Printer inks are translucent which means you can't print on clear materials and expect to be able to see the inks if you put the labels on dark colored or similar colored surfaces.
Q: Do you have any tips for printing Rippedsheets.com laser products?
A: Interesting tips are included in the instructions packaged with each product. For trouble-free laser label printing, please see the technical paper on laser labels posted on this site by clicking on Technical Support.
Q: Do you make laser labels with removable adhesive?
A: Yes, Rippedsheets.com has white poly laser label material with removable adhesive and our waterproof vinyl label material for inkjets has a repositionable adhesive.
Q: How can I keep the toner from scratching off on my polyester and glossy label sheets?
A: Laser printers use powdered toner rather than liquid ink. This toner is actually powdered plastic, and during the printing process the toner is "fused" (melted) onto the surface of the label sheet. Unlike paper labels that have lots of pores and paper fibers for toner to grip onto, polyester and other synthetic label materials have very smooth surfaces that are more difficult for the toner to anchor onto. If the toner isn't fused completely then the image can be scratched off the sheet fairly easily.
You'll need to do three things to fuse the toner completely on the surface of these glossy sheets (in other words; to make this material scratch-proof.)
- Print on a Label setting: Go to File>Print>Preferences> then look for a Paper Type or Media Type or some drop-down menu that allows you to select a Label setting.
- Manually feed the sheets through the bypass tray. Do not put these in the letter tray.
- Open the output door at the back of the printer so the sheets come straight out.
These three steps signal the printer mechanism to slow down -- which gives the toner longer to fuse onto the surface of the sheet.
If these steps fail to make the toner scratchproof then check to see what the printer's dots-per-inch (dpi) setting is. Most printers have a default setting of 600X600 dpi. If the toner scratches off at that setting then lower the dpi to 300X300. This puts less toner on the sheet so the printer has a better chance of fusing all the toner. Note: In most cases using 1200″ × 1200 dpi puts far more toner on the surface of the sheet than can be fused completely.
Q: How do I make waterproof labels?
A: Many customers have already printed Instrument Front Panels, Drum Labels, Personal Care Labels, Outdoor Decals, Window Stickers, Race Car Decals, and hundreds more. Rippedsheets has Waterproof Matte and Waterproof Vinyl Inkjet Label Material, which is designed to useyour off-the-shelf color inkjet with the standard inks. Our material will convert your inkjet into a non-smear, waterproof ink. You have to see it to believe it. Our White and Clear Poly Laser label material is also waterproof, solvent resistant and scuff resistant if printed properly (please see Technical Support). Many people are using our laser poly material to make prototype labels and decals for submittals to such agencies as UL®, CSA® and others.We also have a low temperature label material available that is rated -80° C.
Q: How do I make my image fit onto diecuts on Rippedsheets.com label material?
A: Using your graphics software, make the margins and distances between labels the same as those on the Rippedsheets.com label sheets you receive. Just measure the sheets you get and then step and repeat the design in your software to match. Please follow these instructions:
- Print your labels on regular bond paper. Place the printed bond paper against a custom Rippedsheets.com label sheet in front of a light to make sure that the label diecuts and your art match and line up. Make repeated adjustments in your software to nudge your art into the correct position. DO NOT WASTE YOUR CUSTOM LABEL SHEETs iN THIS SET-UP PROCESS.
- Once your artwork and the Rippedsheets.com label diecuts match up as described above, Print one sheet of the Rippedsheets.com label material through the printer using your artwork. Follow the instructions on your set up sheet for your custom labels from Rippedsheets.com "TO THE T"! This includes using proper label sheet orientation: The "X" mark (marked on the first sheet with a neon flag) goes in the upper-left corner.
- If the printing of your art on the Rippedsheets.com label sheet is off, please measure the amount that it is off with your ruler and adjust your artwork accordingly. For instance, if it is printing 1/8" too high move your art down 1/8" on the page, then print one more label sheet.
- Repeat step 3 if necessary.
Q: How do you price Rippedsheets.com label material?
A: On our website, click on the label material you want in order to get to the product description page and price list. Rippedsheets.com label material is costed by the sheet. Price breaks are at 10 sheets and up. We sell unprinted label sheets that you print on your digital printer, and the Short Run pricing includes diecutting the sheets into the label sizes you need (rectangles with square corners, rectangles with round corners, circles, ovals and special shapes).
Q: If I own a print website will you print for me? As little as one sheet per order?
A: We have a printed label and tag provision group now for our customers print websites. We now have four (6) digital presses and are adding more in our new owned facility with UPS air services within 20 minutes of us with a late PM pick-up.
We provide specialty materials diecut, printed, and blind-shipped to your customers. We can take the files a number of electronic ways, and have software to prepare and print as little as one sheet of labels.
We are providing this service for a cost of about one half of your sales cost or less, even on a one sheet per order basis.
This is an excellent service for us to help our customers. We help fulfill printing while our customers focus on their customer service, websites, website software, customized print label products and SEO.
How To Make Labels in MS Word
Template Building
Making your own custom label template in MS Word is easy. Rippedsheets.com supplies a Set-up sheet with each label order that provides all the dimensions you'll need to create your own label template.
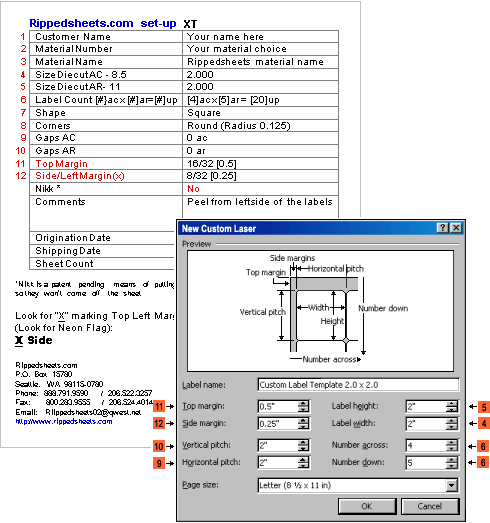
Here is how to make a 2.0″ × 2.0" label template with no gaps between the labels in MS Word: To begin: You will need the Rippedsheets.com Set-up sheet that was included in your label order.
- Open MS Word
- On top Menu Bar, go to Tools, then drop down and select Envelopes and Labels
- In Envelopes and Labels, select Labels, then Options...
- Under Label Options, select New Label...
- Under New Custom Label enter your Label Name (where cursor is blinking), Tab down to fill in the boxes beginning with the right column:
- Label Height: 2.0" - corresponds to the Size Die-cut AR - on the set-up sheet Line 5
- Label Width: 2.0" - corresponds to the Size Die-cut AC -on the set-up sheet Line 4
- Number Across: 4 corresponds to the Label Count (ac) on the set-up sheet Line 6
- Number Down: 5 corresponds to the Label Count (ar) on the set-up
sheet Line 6
- At this point the Preview Diagram in MS Word will start looking like your label sheet. Now continue filling in dimensions in the left column.
- Top Margin .5" - Line 13 on the set-up sheet. (Note: MS Word rounds to 2 decimal points, not 3 decimal points)
- Side/Left Margin .25" - Line 12 on the set-up sheet
- Vertical Pitch 2.0" - corresponds to Line 11 Gaps AR on the set-up sheet.
(Vertical Pitch is the height of the label plus the around gap)
Example: (Gaps .125ar + 2.0ar = Vertical pitch of 2.125) - Horizontal Pitch 2.0" - corresponds to Line 10 Gaps AC on the set-up sheet. (Horizontal Pitch is the width of the label + the across gap)
Example: (Gaps .125ac + 2.0ac = Horizontal/Vertical pitch of 2.125)
- Now the diagram on your screen should look exactly like your label sheets.
- Click OK to close New Custom Label Box, which brings you back to Label Options Box
- Now Click OK to Close Label Options Box
- You are now back to the Envelopes and Labels box. Click the circle: Full Page of the same Label, then New Document
- Now you have a MS Word Document with a Label Layout in Light Gray. Save this MS Word Label Template
Before You Print
Before you print your Rippedsheets.com label sheets, print your label text and graphics on plain copier bond paper. Next, place the printed paper behind a label sheet and hold it up to a light to check your alignment. If your alignment is off, check the following.
Every label sheet has an ″X:″ marking the top left margin. Is the ″X″ at the top left on all your sheets?
If the text and graphics don't appear exactly where you want them on the labels you might need to adjust the top and left/side margins. For example, to move your graphics up the page, make your top margin a little smaller. Or to move your graphics down the page, make it a little bigger. Try adding or deleting space in .05" increments.
If your alignment is still off, go back and check the dimensions on your Rippedsheets.com Set-up sheet against the numbers you've entered into your MS Word custom label template. When you are satisfied with your alignment, then begin printing on your label sheets.
What Your Template Will Look Like
To see how your template will appear in MS Word after following the above instructions, Click Here.
Q: How should I store Rippedsheets.com laser and inkjet supplies?
A: For best results, Rippedsheets.com laser and inkjet products should be stored flat in their original packaging in a cool, dry place. If you have a partial box, please put a heavy book(s) over the sheets to keep them from curling. They should not curl more than 1/8″.
Q: How to make domes on your printed labels?
A: Rippedsheets.com die cuts a label to the shape you want (inkjet or laser - please see our material choices). When you get it, you print your design on the labels in your printer. Then, you carefully remove the material around the label (stripping matrix), leaving the label on the backing all by itself (make sure the sheet is FLAT). You mix a two part clear plastic using a two cup technique (mix in one and pour into another). Making sure the label is flat (can't say this enough) you pour the mix onto the label and spread it out. Surface tension keeps the clear material from falling off the label. Keep pouring the mix until it domes up. Let it cure and as it cures, the bubbles rise and dissipate. The end result is a clear domed label.
Inkjet Printing Tips
General Recommendations for All Inkjet Materials Offered by Rippedsheets.com
General recommendations are to always use the best quality and highest resolution setting your printer allows. However, the higher the resolution (sharpest image and best color), the slower the printer speed will be (more ink consumed). Please balance quality with speed.
- Always start with the Plain Paper and Normal setting and 300x300 or 600x600 DPI on your printer. Higher image quality can lead to over saturation of ink on the material. On photo gloss materials 100702, 102700, 102800 and 106000, and on 103500 Silver Foil and 103600 Gold Foil use only "Best" quality printing and "Photo Paper" settings. Also, see Waterproof section below.
- Store inkjet material in its original plastic wrapper and in a cool, dry place to avoid humidity.
- Put a weight on the material to keep it flat in and out of the box, but do not crush edges.
- Handle material on the edges so as not to get oil from your fingers (which interferes with printing) on the surface.
- Allow ink to dry before stacking or handling.
- Smear Resistance Rippedsheets.com 100400 Protective Spray can be applied for short-term smear, moisture and scuff resistance on most non-waterproof inkjet materials (exceptions for smear resistance may be matte uncoated paper face stock materials).
HP DeskJet Series
500, 600, 800 series: use best printing and plain paper media setting.
Epson Stylus
Use 720 dpi, high quality gloss paper setting, high speed unchecked.
Canon Bubblejet Series
Use high gloss film setting, high quality print setting and check fine button.
All other inkjets printers
Experiment with similar settings shown above.
Store inkjet media in plastic in a cool, dry place. Put a weight on the material to keep it flat but do not crush edges. Handle material on the edges so as not to put oil on surface which interferes with printing. Allow inkjet inks to dry before using. Use Rippedsheets.com's protective spray for short-term protection. Follow instructions on spray can.
Notes about Rippedsheets.com inkjet material durability
Many customers are selling our materials to compete with professional sign companies and vinyl sign shops. Please be sure you understand the environmental surface where your sign will go and the environment it will be exposed to.
Evaluate the surface onto which it will be applied. See if the sign must be pre-mounted on a metal or plastic backer to stick better and then mechanically fasten the sign to the surface. Pre-test material for adhesive compatibility or you may have a warranty issue with your customer. Our Inkjet vinyl self adhesive is a repositionable adhesive and it is meant to be applied and removed, not last years.
Self-Adhesives
When using our materials to compete with professional sign companies and vinyl sign shops, it's important to evaluate the surface to see if the inkjet media will stick well, or if it must be pre-mounted on another metal or plastic surface to which it will adhere. Pre-test the material for adhesive compatibility, or you may have warranty issues with your customer.
Waterproof Inkjet Materials
Rippedsheets.com waterproof inkjet materials are made with a special porous top coating that encapsulates the ink. If you use a high printing resolution, you will put too much ink on the material and the ink may over saturate the micro-pores. Then when the labels get wet, the ink that couldn't be absorbed will run on the sheet. To resolve this, you can use a lower printing resolution which reduces the dots per inch, or you can hold the sheets under running water and use your fingertips to wash away the excess ink.
Jamming
If Rippedsheets.com inkjet materials jam in your printer, please make sure the sheets are flat and you are not attempting to feed too many sheets at once. Lower cost inkjet printers have simple feed systems that may require feeding one sheet at a time. Top feeding inkjet printers may require a helping hand to make sheets feed straight down. If sheets jam in bottom-feeding inkjets, you may have to adjust the paper guides or again give a hand for straight feeding. If the rollers will not take the material, then you can try to force the material into the rollers.
Good Luck and Good Printing from Rippedsheets.com.
Laser Printing Tips
General Recommendations for All Laser Materials Offered by Rippedsheets.com
Label Characteristics
Labels (also called stickers and pressure sensitive materials) are multi-ply materials consisting of a "sandwich" of various combinations of face stock (printable stock), adhesives, and liners (removable protective backings.) The multiple layers can result in thick, difficult-to-handle materials.
The materials used in labels have a wide range of properties that can affect printing. The varieties of laser label materials offered by Rippedsheets.com include paper, plastics, and even metallic foils. Observing label-printing guidelines can prevent jams in the printer, and prevent the label or adhesive from melting if the sheet stops in the fuser during a paper jam.
Important: Always Check Label Printing Instructions for Your Printer
Your printer may accept a wide range of stock weights, but materials either too light or too heavy can cause handling and printing problems.Since every printer is different, check the Label Printing instructions in your printer documentation.
Label Settings for Most Laser Printers
If your laser printer is working correctly, the toner, which is actually powdered plastic, will be melted (fused) onto the surface of the label material and it will almost feel smooth. If the image feels bumpy or chalky, your printer is not hot enough and is not fusing correctly which may cause the image to rub or flake off the label surface.
To get the best results follow these three steps:
- Always print labels on a "Label" setting (File, Print, Properties, Paper, Type, Labels.)
- Always feed labels into the printer using the bypass tray. This automatically slows down the printer, and raises the temperature.
- It is also important to open the output door on the back of the printer so the labels travel in a straight path and don't have to go around the drum. Remember; be sure to check your printer d ocumentation for instructions specific to your printer.
Environmental Conditions Are Important
Temperature and humidity levels can have a major impact on your label printing success. Even small changes (such as from day to night) can greatly affect handling in the printer if the label material being processed is near the limits of acceptability.
All label stock should be "conditioned" while still in its original wrappings. To condition stock, store it in the same environment as the printer for 24 to 48 hours before printing to let it stabilize in the new conditions. It may take longer if there is a wide difference in the storage or transportation environment and the printer environment. This exposure time may also need to be longer for thick stock because of the mass of the material. Early removal of wrapping materials may cause uneven moisture content that can cause curl, waviness, and other problems in the printer.
Rippedsheets.com recommends printing in a temperature range of 18 to 24°C (65 to 75°F) with relative humidity of 40 to 60%. Many laser printers are designed to operate in a temperature range of 15.5 to 32°C (60 to 90°F) with relative humidity of 8 to 80%. Printing in an environment outside these recommendations may cause jams, feeding problems, reduced print quality, and cause labels to peel (delaminate.) Vinyl labels are especially susceptible to these environment-related problems.
Eliminate The Curl Factor
Early removal of wrapping materials can also cause curl, which can cause feeding problems and paper jams in the printer. Thicker label sheets are more inclined to curl than thinner ones. To ensure that label sheets will feed through your printer successfully, curl is recommended to not exceed 3 mm or (1/8".) It's best to store label stock with a 10 - 15 lb weight on top. It may be necessary to gently and evenly roll the label stock back-wards against the curl to flatten it out.
Maintenance Procedures
Check your printer documentation. Your manufacturer may or may not recommend the following for labels.
Use the following procedure to clean the printer for every 250 sheets of polyester labels and for every 200 sheets of paper labels:
TURN OFF THE PRINTER!
- Clean the fuser roller and replace the fuser cleaner if it is heavily contaminated. Follow the instructions in your printer user's guide.
- Remove all paper or forms from the paper tray and load the tray with plain bond paper.
- Feed five sheets of clean bond paper through the printer, then wait at least five seconds. Repeat this procedure three additional times using five sheets of clean bond paper each time.
- Remove the bond paper from the paper tray and reload the original paper or forms.
Note: Failure to follow maintenance procedures could cause jamming, poor print quality, feeding problems, and fuser problems.
If your laser printer has a fuser cleaner, it is normally changed when the print cartridge is replaced. When using labels,
the fuser cleaner may need to be changed more frequently. Check the fuser cleaner every 2,000 pages and replace it if it is crusty or stiff. Fuser cleaners also may lessen toner buildup on some labels, producing better print quality.
Clean the inside of the printer frequently, possibly daily. Consult your printer documentation for specific instructions on how to properly clean your printer. Removal of the debris will help prevent feeding, fusing, and other types of problems associated with debris.
Refer to your printer documentation for all maintenance procedures to maintain the print quality and reliability of your printer.
Jamming
If labels get jammed in the transfer drum or fuser DO NOT PULL LABEL MATERIAL OUT. IT MAY SCRATCH YOUR DRUM OR FUSER! CAREFULLY TURN THE ROLLERS TO ROLL THE MATERIAL BACK OUT.
Do not load labels together with paper or transparencies in the same paper tray. Combining print materials can cause feeding problems. Labels are one of the most difficult print materials for laser printers. A special label fuser cleaner (wiper) should be used for dedicated label application to optimize printer performance -- if available from your manufacturer.
Good Luck and Good Printing from Rippedsheets.com.
For more tips see Tech Support.
Q: What are the differences between copier, inkjet and laser printer products?
A: Rippedsheets.com supplies are specially designed to perform optimally through specific printer or machine types. The paper or label and adhesive construction differs to accommodate the different paper feed paths and heat environments. Rippedsheets.com specializes in producing label materials for digital printers wired to computers.
Q: What is Rippedsheets.com and "Where in the world is Rippedsheets.com"™?
A: Rippedsheets.com is a micro converter of label material for digital printers. We have designed special machinery to diecut the materials we manufacture specifically for color lasers and color inkjet printers. We are unique in that we offer labels in any shape or size and we don't charge tooling for most short run jobs. We offer most of our labels and tags either unprinted or preprinted with your custom artwork. We are located in Benton City WA USA but sell throughout the world.
Q: What size should my labels be?
A: You need to make sure that:
- Your labels fit the container or application area (the labels can't be too big or too small). Please use a ruler to measure the area you intend to apply the label to.
- Your artwork fits the label size you determined above. Don't butt the text or borders up against the edge of the label because your label sheet will shift through your printer. Allow a safe 1/8″ of no printing between the edge of your label and the outer edge of your label art.
- It's Rippedsheets.com's preference that you determine the size of your label.
- If you print your label on plain paper and have problems printing it, then that is an indication that you will have problems printing the thicker label sheet. You will have to tweak your artwork before you start printing labels.
- Follow the instructions on your set up sheet for your custom labels from Rippedsheets.com "TO THE T"!
Q: What type of label adhesive is used?
A: The adhesive used on laser labels is an acrylic emulsion-based permanent adhesive. This type of adhesive is suitable for general purpose adhesion to most papers, envelopes, corrugated shipping containers, file folders, bare and painted metal, polypropylene and polyethylene bags.
Q: Where can I purchase Rippedsheets.com products?
A: Rippedsheets.com brand is sold on the World Wide Web. Some of Rippedsheets.com could be distributed at office supply, printer or computer retail dealers, as well as specialty distributors such as in Scientific, Agriculture, and Label Converting.
Q: Which laser printers will not print Rippedsheets.com glossy white laser label materials?
A: The answer is simple: Old laser printers. Many laser printers produced as late as 1995 have curved paper paths (like the Xerox 5000 series, Canon 500 series, HP 2-5 series, and many others) and will not work with the thicker, slippery gloss materials. Those manufacturers did not design their paper-handling systems to grab the glossy sheet without slipping, and/or did not make the paper paths thick enough to allow the thicker glossy papers to pass through the twists and turns in the laser printer. However, all the above-mentioned machines will take our matte white laser label paper material, and will print just fine. They may also take the poly materials if they will print overhead slides successfully. Earlier machines that work well are all of the Ricohs, Xerox Docucolors, Laniers, Gestetners and all other similar machines with the Ricoh patented straight paper path.
Q: Will my artwork print on my digital printer with Rippedsheets.com label material?
A: Most artwork comes out just fine. Problems occur when there is the need for extremely tight registration. The two major indices are wanting to perfectly center an image on the label or create precise borders. Since your printer's material path will sometimes shift the label material and since there are very small variations between the diecut label group and edge of the label sheet (see Order Form), you should review your artwork for possible modifications that will make it run better.
Q: Will Rippedsheets.com label material work on all inkjets?
A: Yes, it will work on all inkjets that will take label material. Most color inkjets will take label materials. Desktop inkjet inks are similar and have slightly different performance characteristics. Rippedsheets.com inkjet material has been tested on all desktop inkjet ink systems
Q: How do I load blank labels into my printer tray?
A: Your printer may print on many labels designed for use with laser printers. Check your documentation.
Do not load labels together with paper or transparencies in the same paper tray. Combining print materials can cause feeding problems. Labels are one of the most difficult print materials for laser printers. A special label fuser cleaner (wiper) should be used for dedicated label application to optimize printer performance if available from your manufacturer.